First Time Setup of your Oboo Smart Clock Maker Edition
Quote from Lazar Demin on July 16, 2018, 11:39 amLast Update: Aug 1, 2018
So you’ve just received your Oboo Smart Clock Maker Edition! Here’s a guide on how to set it up for the first time!
Before we dive in, we just want to say thank you for helping bring Oboo Smart Clock to life, we couldn’t have done it without you!
Here are some useful topics
[Updating timezone and time & date]
[Enable Bluetooth Audio on Oboo]
[Updating Oboo Software]
[Manually Set Weather Location]
[Low level interaction with audio subsystem]
[First Time Setup] (This Post)
Unbox and Power Up
Unpack your Oboo and included power supply from the box. Set the Oboo down and plug the power adapter into the circular socket on the back side of your Oboo. Plug the the power adapter into a power outlet.
Turn on the Oboo by sliding the power switch on the back. It’s now taken its first breath and has started booting. You will know it has completely booted when the info Display on the right side displays graphics. This will take about a minute.
Connect to Oboo’s WiFi AP
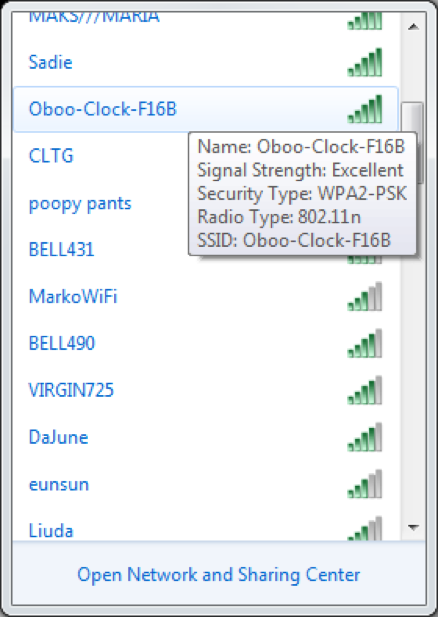
Your Oboo Smart Clock will be hosting a WiFi access point network out of the box. The name of your Oboo’s WiFi network will be something like Oboo-Clock-XXXX where XXXX are digits unique to your device.
Use your computer to connect to that network.
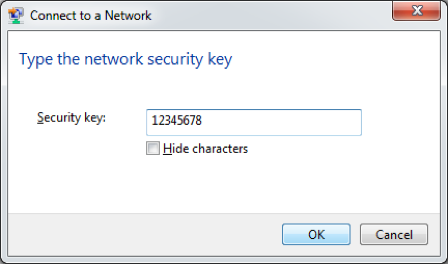
The default password is 12345678 (just like on an Omega2).
Connecting to the Oboo’s Command Line
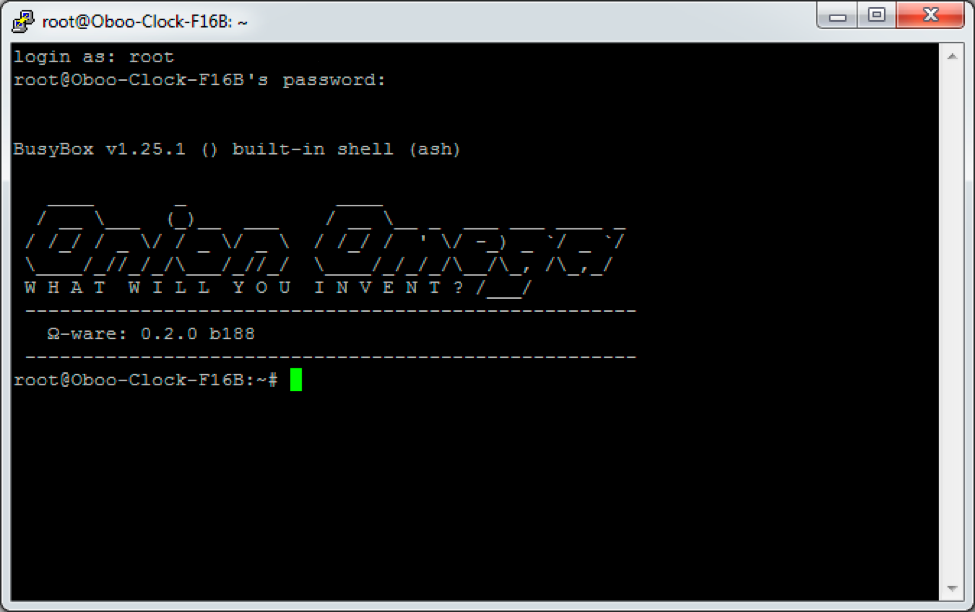
We’ll be using SSH to access the command line of the IoT computer running the show inside the Oboo Smart Clock. Take a look at our existing guide on using SSH to connect to the command line for details and instructions.
In a nutshell, if you’re connected to the Oboo’s network, you will need to connect to 192.168.3.1
The default username is root and the password is onioneer.
If you’re curious, `onioneer` is a portmanteau of Onion and Engineer
You now have access to the Linux command line of your Oboo Smart Clock!
Connect Your Oboo to your Home WiFi Network
Now let’s connect the Oboo Smart Clock to your WiFi network to give it Internet access. We’ll use the wifisetup command to help us.
Enter wifisetup in a terminal and you’ll see the following output:
root@Oboo-Clock-F16B:/# wifisetup
Onion Omega Wifi Setup

Select from the following:
1) Scan for Wifi networks
2) Type network info
q) Exit

Selection:
You can enter 1, and your Oboo will scan for available networks:
Selection: 1
Scanning for wifi networks...

Select Wifi network:
1) BYOB
2) studio sixteen
3) EGEnergy
4) calendar
5) Authentic
6) myWiFiNetwork
7) DaJune
8) BELL434

Selection:
Enter your selection and you will be prompted for a password if required. Your network authentication type will be automatically detected in the scan:
Selection: 6
Network: myWiFiNetwork
Authentication type: WPA2PSK
Enter password:
Enter your password, and hit enter. Your Oboo's network adapter will restart and attempt to connect to the new network.
Since the network adapter is restarting, the Oboo's own WiFi Access Point will go down and be inaccessible during this period, but it will come back up in roughly 30 seconds.
Updating the Software
Now that you've connected your Oboo Smart Clock to the internet, you’ll want to update it's software. In order to do so, run the following command:
sh /etc/cron.week/firmware_update.shAnd now you are ready to customize your device and bring your smart ideas to life with your new Oboo Smart Clock Maker Edition!
What’s Next?
Check out our list of available guides:
Stay tuned, we’ll be putting out more guides on using the Oboo Smart Clock Maker Edition in the coming days!
Last Update: Aug 1, 2018
So you’ve just received your Oboo Smart Clock Maker Edition! Here’s a guide on how to set it up for the first time!
Before we dive in, we just want to say thank you for helping bring Oboo Smart Clock to life, we couldn’t have done it without you!
Here are some useful topics
[Updating timezone and time & date]
[Enable Bluetooth Audio on Oboo]
[Updating Oboo Software]
[Manually Set Weather Location]
[Low level interaction with audio subsystem]
[First Time Setup] (This Post)
Unbox and Power Up
Unpack your Oboo and included power supply from the box. Set the Oboo down and plug the power adapter into the circular socket on the back side of your Oboo. Plug the the power adapter into a power outlet.
Turn on the Oboo by sliding the power switch on the back. It’s now taken its first breath and has started booting. You will know it has completely booted when the info Display on the right side displays graphics. This will take about a minute.
Connect to Oboo’s WiFi AP
Your Oboo Smart Clock will be hosting a WiFi access point network out of the box. The name of your Oboo’s WiFi network will be something like Oboo-Clock-XXXX where XXXX are digits unique to your device.
Use your computer to connect to that network.

The default password is 12345678 (just like on an Omega2).

Connecting to the Oboo’s Command Line
We’ll be using SSH to access the command line of the IoT computer running the show inside the Oboo Smart Clock. Take a look at our existing guide on using SSH to connect to the command line for details and instructions.
In a nutshell, if you’re connected to the Oboo’s network, you will need to connect to 192.168.3.1
The default username is root and the password is onioneer.
If you’re curious, `onioneer` is a portmanteau of Onion and Engineer
You now have access to the Linux command line of your Oboo Smart Clock!

Connect Your Oboo to your Home WiFi Network
Now let’s connect the Oboo Smart Clock to your WiFi network to give it Internet access. We’ll use the wifisetup command to help us.
Enter wifisetup in a terminal and you’ll see the following output:
root@Oboo-Clock-F16B:/# wifisetup
Onion Omega Wifi Setup

Select from the following:
1) Scan for Wifi networks
2) Type network info
q) Exit

Selection:
You can enter 1, and your Oboo will scan for available networks:
Selection: 1
Scanning for wifi networks...

Select Wifi network:
1) BYOB
2) studio sixteen
3) EGEnergy
4) calendar
5) Authentic
6) myWiFiNetwork
7) DaJune
8) BELL434

Selection:
Enter your selection and you will be prompted for a password if required. Your network authentication type will be automatically detected in the scan:
Selection: 6
Network: myWiFiNetwork
Authentication type: WPA2PSK
Enter password:
Enter your password, and hit enter. Your Oboo's network adapter will restart and attempt to connect to the new network.
Since the network adapter is restarting, the Oboo's own WiFi Access Point will go down and be inaccessible during this period, but it will come back up in roughly 30 seconds.
Updating the Software
Now that you've connected your Oboo Smart Clock to the internet, you’ll want to update it's software. In order to do so, run the following command:
sh /etc/cron.week/firmware_update.sh
And now you are ready to customize your device and bring your smart ideas to life with your new Oboo Smart Clock Maker Edition!
What’s Next?
Check out our list of available guides:
Stay tuned, we’ll be putting out more guides on using the Oboo Smart Clock Maker Edition in the coming days!
Quote from ihermit2 on July 16, 2018, 4:03 pmSo before you can run the weekly firmware update first you must connect to your wifi. Try the command wifisetup
So before you can run the weekly firmware update first you must connect to your wifi. Try the command wifisetup
Quote from Lazar Demin on July 16, 2018, 7:16 pmRight, forgot that part, added it in now.
Right, forgot that part, added it in now.
Quote from ihermit2 on July 16, 2018, 7:21 pm<edits: As I was corrected below needed an = sign to set timezone thanks for the correction.>
<more edits: Official obsolessence>
THIS IS OFFICIALLY OBSOLETE BETTER METHOD HERE --> Setting your oboos time and date
ok so now we got the clock on the network. Let's move on to getting and accurate time.
First a note about timezones. the General format is <Standard Timename><-offset from UTC><Daylight/Summer time name>
hopefully we'll eventually get to proper timezone files.
some examples:
EST5EDT US Eastern timezone (New York, Atlanta, Boston, DC and the like)
CST6CDT US Central timezone (Chicago, Dallas, Houston, St Louis others)
MST7MDT US Mountain timezone (Denver, Salt Lake City, Phoenix sometimes)
PST8PDT US Pacific timezone (Portland, Seattle, Las Vegas, All those California Cities)
if you know your offset you can probably just use GMTx where x is the opposite sign of your offset for example Central European Time is 1 hour ahead of GMT so it would be GMT-1
I don't think automatic Summer/Daylight Savings time switching is enabled currently
so back to the shell prompt:
uci show system

find timezone in the list above it's probably system.@system[0].timezone

uci get system.@system[0].timezone

The result should be GMT

uci set system.@system[0].timezone=EST5EDT

instead of EST5EDT substitute the value determined aboce

uci commit

reboot

after the reboot completes the clock face should show the current time.
<edits: As I was corrected below needed an = sign to set timezone thanks for the correction.>
<more edits: Official obsolessence>
THIS IS OFFICIALLY OBSOLETE BETTER METHOD HERE --> Setting your oboos time and date
ok so now we got the clock on the network. Let's move on to getting and accurate time.
First a note about timezones. the General format is <Standard Timename><-offset from UTC><Daylight/Summer time name>
hopefully we'll eventually get to proper timezone files.
some examples:
EST5EDT US Eastern timezone (New York, Atlanta, Boston, DC and the like)
CST6CDT US Central timezone (Chicago, Dallas, Houston, St Louis others)
MST7MDT US Mountain timezone (Denver, Salt Lake City, Phoenix sometimes)
PST8PDT US Pacific timezone (Portland, Seattle, Las Vegas, All those California Cities)
if you know your offset you can probably just use GMTx where x is the opposite sign of your offset for example Central European Time is 1 hour ahead of GMT so it would be GMT-1
I don't think automatic Summer/Daylight Savings time switching is enabled currently
so back to the shell prompt:
uci show system

find timezone in the list above it's probably system.@system[0].timezone

uci get system.@system[0].timezone

The result should be GMT

uci set system.@system[0].timezone=EST5EDT

instead of EST5EDT substitute the value determined aboce

uci commit

reboot

after the reboot completes the clock face should show the current time.
Quote from Red on July 17, 2018, 12:45 amA couple things here:
- Running "sh /etc/cron.week/firmware_update.sh" didn't update me to 0.0.2 (not sure if the 0.0.1 build # changed):
root@Oboo-Clock-XXXX:~# sh /etc/cron.week/firmware_update.sh
update available
Downloading http://repo.onion.io/omega2/packages/core/Packages.gz
Updated list of available packages in /var/opkg-lists/omega2_core
Downloading http://repo.onion.io/omega2/packages/core/Packages.sig
Signature check passed.
Downloading http://repo.onion.io/omega2/packages/base/Packages.gz
Updated list of available packages in /var/opkg-lists/omega2_base
Downloading http://repo.onion.io/omega2/packages/base/Packages.sig
Signature check passed.
Downloading http://repo.onion.io/omega2/packages/packages/Packages.gz
Updated list of available packages in /var/opkg-lists/omega2_packages
Downloading http://repo.onion.io/omega2/packages/packages/Packages.sig
Signature check passed.
Downloading http://repo.onion.io/omega2/packages/onion/Packages.gz
Updated list of available packages in /var/opkg-lists/omega2_onion
Downloading http://repo.onion.io/omega2/packages/onion/Packages.sig
Signature check passed.
Downloading http://repo.getoboo.com/oboo-clock/packages/Packages.gz
Updated list of available packages in /var/opkg-lists/oboo_clock
Downloading http://repo.getoboo.com/oboo-clock/packages/Packages.sig
Signature check passed.root@Oboo-Clock-XXXX:/etc/config# uci show onion
onion.@onion[0]=onion
onion.@onion[0].version='0.0.1'
onion.@onion[0].build='109'
onion.@onion[0].coprocessor='0.4.2'
onion.console=console
onion.console.setup='0'
onion.console.install='0'
onion.console.editor='0'
onion.console.terminal='0'
onion.console.webcam='0'
onion.console.nodered='0'2. Here' the correct command from your example to get the timezone to display correctly: Fails to set: uci set system.@system[0].timezone EST5EDT Sets correctly: uci set system.@system[0].timezone=EST5EDT Sets correctly: uci set system.@system[0].timezone=GMT4
A couple things here:
- Running "sh /etc/cron.week/firmware_update.sh" didn't update me to 0.0.2 (not sure if the 0.0.1 build # changed):
root@Oboo-Clock-XXXX:~# sh /etc/cron.week/firmware_update.sh
update available
Downloading http://repo.onion.io/omega2/packages/core/Packages.gz
Updated list of available packages in /var/opkg-lists/omega2_core
Downloading http://repo.onion.io/omega2/packages/core/Packages.sig
Signature check passed.
Downloading http://repo.onion.io/omega2/packages/base/Packages.gz
Updated list of available packages in /var/opkg-lists/omega2_base
Downloading http://repo.onion.io/omega2/packages/base/Packages.sig
Signature check passed.
Downloading http://repo.onion.io/omega2/packages/packages/Packages.gz
Updated list of available packages in /var/opkg-lists/omega2_packages
Downloading http://repo.onion.io/omega2/packages/packages/Packages.sig
Signature check passed.
Downloading http://repo.onion.io/omega2/packages/onion/Packages.gz
Updated list of available packages in /var/opkg-lists/omega2_onion
Downloading http://repo.onion.io/omega2/packages/onion/Packages.sig
Signature check passed.
Downloading http://repo.getoboo.com/oboo-clock/packages/Packages.gz
Updated list of available packages in /var/opkg-lists/oboo_clock
Downloading http://repo.getoboo.com/oboo-clock/packages/Packages.sig
Signature check passed.root@Oboo-Clock-XXXX:/etc/config# uci show onion
onion.@onion[0]=onion
onion.@onion[0].version='0.0.1'
onion.@onion[0].build='109'
onion.@onion[0].coprocessor='0.4.2'
onion.console=console
onion.console.setup='0'
onion.console.install='0'
onion.console.editor='0'
onion.console.terminal='0'
onion.console.webcam='0'
onion.console.nodered='0'
2. Here' the correct command from your example to get the timezone to display correctly:
     Fails to set:  uci set system.@system[0].timezone EST5EDT
     Sets correctly: uci set system.@system[0].timezone=EST5EDT
     Sets correctly: uci set system.@system[0].timezone=GMT4
Quote from jnaujok on July 17, 2018, 1:05 amThanks for getting these instructions posted. Spent about three hours last night looking for an update.
Thanks for getting these instructions posted. Spent about three hours last night looking for an update.
Quote from Red on July 17, 2018, 1:39 amQuote from Red on July 17, 2018, 12:45 amA couple things here:
- Running "sh /etc/cron.week/firmware_update.sh" didn't update me to 0.0.2 (not sure if the 0.0.1 build # changed):
root@Oboo-Clock-XXXX:~# sh /etc/cron.week/firmware_update.sh
update available
Downloading http://repo.onion.io/omega2/packages/core/Packages.gz
Updated list of available packages in /var/opkg-lists/omega2_core
Downloading http://repo.onion.io/omega2/packages/core/Packages.sig
Signature check passed.
Downloading http://repo.onion.io/omega2/packages/base/Packages.gz
Updated list of available packages in /var/opkg-lists/omega2_base
Downloading http://repo.onion.io/omega2/packages/base/Packages.sig
Signature check passed.
Downloading http://repo.onion.io/omega2/packages/packages/Packages.gz
Updated list of available packages in /var/opkg-lists/omega2_packages
Downloading http://repo.onion.io/omega2/packages/packages/Packages.sig
Signature check passed.
Downloading http://repo.onion.io/omega2/packages/onion/Packages.gz
Updated list of available packages in /var/opkg-lists/omega2_onion
Downloading http://repo.onion.io/omega2/packages/onion/Packages.sig
Signature check passed.
Downloading http://repo.getoboo.com/oboo-clock/packages/Packages.gz
Updated list of available packages in /var/opkg-lists/oboo_clock
Downloading http://repo.getoboo.com/oboo-clock/packages/Packages.sig
Signature check passed.root@Oboo-Clock-XXXX:/etc/config# uci show onion
onion.@onion[0]=onion
onion.@onion[0].version='0.0.1'
onion.@onion[0].build='109'
onion.@onion[0].coprocessor='0.4.2'
onion.console=console
onion.console.setup='0'
onion.console.install='0'
onion.console.editor='0'
onion.console.terminal='0'
onion.console.webcam='0'
onion.console.nodered='0'2. Here' the correct command from your example to get the timezone to display correctly: Fails to set: uci set system.@system[0].timezone EST5EDT Sets correctly: uci set system.@system[0].timezone=EST5EDT Sets correctly: uci set system.@system[0].timezone=GMT4
I get now that the version listed when you SSH into the box isn't the "upgrades needed" mentioned on the screen, but I still see this on the screen. Digging deeper into the script files, opkg doesn't provide output by default. Fun. Relavent parts of the the update scripts with verbose output:
root@Oboo-Clock-XXXX:/etc/cron.week# opkg upgrade -V2 oboo-clock-base
opkg_conf_parse_file: Loading conf file /etc/opkg.conf.
opkg_conf_parse_file: Loading conf file /etc/opkg/customfeeds.conf.
opkg_conf_parse_file: Loading conf file /etc/opkg/distfeeds.conf.
pkg_hash_load_feeds:
pkg_hash_load_status_files:
pkg_info_preinstall_check: Updating file owner list.
opkg_upgrade_pkg: Package oboo-clock-base (0.0.5-1) installed in root is up to date.
opkg_configure_packages: Configuring unpacked packages.opkg_configure_packages: Reordering packages before configuring them...
root@Oboo-Clock-XXXX:/etc/cron.week# opkg -V2 upgrade oboo-repo-keys oboo-clock-card-manager oboo-clock-cards oboo-clock-mcu o
boo-clock-alarm-system oboo-clock-fw-manager oboo-clock-provisioning-scripts
opkg_conf_parse_file: Loading conf file /etc/opkg.conf.
opkg_conf_parse_file: Loading conf file /etc/opkg/customfeeds.conf.
opkg_conf_parse_file: Loading conf file /etc/opkg/distfeeds.conf.
pkg_hash_load_feeds:
pkg_hash_load_status_files:
pkg_info_preinstall_check: Updating file owner list.
opkg_upgrade_pkg: Package oboo-repo-keys (0.0.1-1) installed in root is up to date.
opkg_upgrade_pkg: Package oboo-clock-card-manager (0.2.2-1) installed in root is up to date.
opkg_upgrade_pkg: Package oboo-clock-cards (0.2.2-5) installed in root is up to date.
opkg_upgrade_pkg: Package oboo-clock-mcu (0.4.2-2) installed in root is up to date.
opkg_upgrade_pkg: Package oboo-clock-alarm-system (0.0.1-2) installed in root is up to date.
opkg_upgrade_pkg: Package oboo-clock-fw-manager (0.0.5-1) installed in root is up to date.
opkg_upgrade_pkg: Package oboo-clock-provisioning-scripts (0.2.1-2) installed in root is up to date.
opkg_configure_packages: Configuring unpacked packages.
opkg_configure_packages: Reordering packages before configuring them...This also matches what I see when I download the packages manually from http://repo.getoboo.com/oboo-clock/packages/Packages.gz
Quote from Red on July 17, 2018, 12:45 amA couple things here:
- Running "sh /etc/cron.week/firmware_update.sh" didn't update me to 0.0.2 (not sure if the 0.0.1 build # changed):
root@Oboo-Clock-XXXX:~# sh /etc/cron.week/firmware_update.sh
update available
Downloading http://repo.onion.io/omega2/packages/core/Packages.gz
Updated list of available packages in /var/opkg-lists/omega2_core
Downloading http://repo.onion.io/omega2/packages/core/Packages.sig
Signature check passed.
Downloading http://repo.onion.io/omega2/packages/base/Packages.gz
Updated list of available packages in /var/opkg-lists/omega2_base
Downloading http://repo.onion.io/omega2/packages/base/Packages.sig
Signature check passed.
Downloading http://repo.onion.io/omega2/packages/packages/Packages.gz
Updated list of available packages in /var/opkg-lists/omega2_packages
Downloading http://repo.onion.io/omega2/packages/packages/Packages.sig
Signature check passed.
Downloading http://repo.onion.io/omega2/packages/onion/Packages.gz
Updated list of available packages in /var/opkg-lists/omega2_onion
Downloading http://repo.onion.io/omega2/packages/onion/Packages.sig
Signature check passed.
Downloading http://repo.getoboo.com/oboo-clock/packages/Packages.gz
Updated list of available packages in /var/opkg-lists/oboo_clock
Downloading http://repo.getoboo.com/oboo-clock/packages/Packages.sig
Signature check passed.root@Oboo-Clock-XXXX:/etc/config# uci show onion
onion.@onion[0]=onion
onion.@onion[0].version='0.0.1'
onion.@onion[0].build='109'
onion.@onion[0].coprocessor='0.4.2'
onion.console=console
onion.console.setup='0'
onion.console.install='0'
onion.console.editor='0'
onion.console.terminal='0'
onion.console.webcam='0'
onion.console.nodered='0'2. Here' the correct command from your example to get the timezone to display correctly: Fails to set: uci set system.@system[0].timezone EST5EDT Sets correctly: uci set system.@system[0].timezone=EST5EDT Sets correctly: uci set system.@system[0].timezone=GMT4
I get now that the version listed when you SSH into the box isn't the "upgrades needed" mentioned on the screen, but I still see this on the screen. Digging deeper into the script files, opkg doesn't provide output by default. Fun. Relavent parts of the the update scripts with verbose output:
root@Oboo-Clock-XXXX:/etc/cron.week# opkg upgrade -V2 oboo-clock-base
opkg_conf_parse_file: Loading conf file /etc/opkg.conf.
opkg_conf_parse_file: Loading conf file /etc/opkg/customfeeds.conf.
opkg_conf_parse_file: Loading conf file /etc/opkg/distfeeds.conf.
pkg_hash_load_feeds:
pkg_hash_load_status_files:
pkg_info_preinstall_check: Updating file owner list.
opkg_upgrade_pkg: Package oboo-clock-base (0.0.5-1) installed in root is up to date.
opkg_configure_packages: Configuring unpacked packages.opkg_configure_packages: Reordering packages before configuring them...
root@Oboo-Clock-XXXX:/etc/cron.week# opkg -V2 upgrade oboo-repo-keys oboo-clock-card-manager oboo-clock-cards oboo-clock-mcu o
boo-clock-alarm-system oboo-clock-fw-manager oboo-clock-provisioning-scripts
opkg_conf_parse_file: Loading conf file /etc/opkg.conf.
opkg_conf_parse_file: Loading conf file /etc/opkg/customfeeds.conf.
opkg_conf_parse_file: Loading conf file /etc/opkg/distfeeds.conf.
pkg_hash_load_feeds:
pkg_hash_load_status_files:
pkg_info_preinstall_check: Updating file owner list.
opkg_upgrade_pkg: Package oboo-repo-keys (0.0.1-1) installed in root is up to date.
opkg_upgrade_pkg: Package oboo-clock-card-manager (0.2.2-1) installed in root is up to date.
opkg_upgrade_pkg: Package oboo-clock-cards (0.2.2-5) installed in root is up to date.
opkg_upgrade_pkg: Package oboo-clock-mcu (0.4.2-2) installed in root is up to date.
opkg_upgrade_pkg: Package oboo-clock-alarm-system (0.0.1-2) installed in root is up to date.
opkg_upgrade_pkg: Package oboo-clock-fw-manager (0.0.5-1) installed in root is up to date.
opkg_upgrade_pkg: Package oboo-clock-provisioning-scripts (0.2.1-2) installed in root is up to date.
opkg_configure_packages: Configuring unpacked packages.
opkg_configure_packages: Reordering packages before configuring them...
This also matches what I see when I download the packages manually from http://repo.getoboo.com/oboo-clock/packages/Packages.gz
Quote from Bruce Muff on July 17, 2018, 4:37 pmthanks for the updates, guys. I have mine up and running with correct time zone. Ready for accurate weather forecast, then music
thanks for the updates, guys. I have mine up and running with correct time zone. Ready for accurate weather forecast, then music
